Tuesday, February 26, 2013

Preventing Plagiarism in the Online Art Classroom

The risk of plagiarism in the classroom is not a new concern. However, we are used to seeing it in the form of writing. In the online art classroom because I do not see my students completing work, I am vulnerable to the risk of receiving plagiarized work from the Internet. Especially with sites like DeviantArt, students have many places online that they could find amateur artworks to pass off as their own. So how do I make sure students are submitting their own work? Part of what I do is pay attention to style and quality of work submitted. If I have a student submit something that is clearly above the level of previous work they have submitted, that is a red flag. If I receive a drawing that has very low resolution (especially 72dpi) this is also a red flag. However, just because I think it is plagiarism does not mean I can prove it. For this, Google image search is a wonderful tool so I have created a step-by-step guide you can easily use if you are ever suspicious about student work.

Step 1:
   
Go to Google.com and click on Images
 Step 2:
Once in Image Search, click on the camera icon

Step 3:
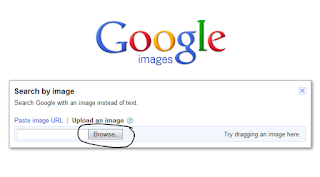
Click upload image (make sure you save a copy of the image in question)
Step 4:
Click browse and find the image on your computer
Step 5:
Once submitted you will see one of several things. Google may provide you with a best guess of what the image's search terms were (you would then click on the link for "sketches of rooms"). It also will provide you with visually similar images and sometimes the image in question is present right there!
Here is another example of what you may see. Sometimes you won't see the image in the list of similar images but Google will provide you a list of websites where the image is present. If you have the option to click "All sizes", make sure you do as this will widen your search and help catch students who are clever and re-size the image before submitting it.

Wednesday, February 20, 2013

Aligning to Common Core in the (Online) Art Classroom

As the 2012-2013 school year continues to tick by, we continue to align the Art 1 classroom to meet the Common Core State Standards (CCSS), which will be mandatory by 2014-2015. Though it seems far away, my teammates and I are already working towards 100% alignment. Of course we all still have many questions. We spent last week together in PD brainstorming ideas for aligning our Art 1 curriculum to the CCSS. In many cases we are adding small written assignments to accompany drawing projects. This has lead to some shifts away from reading quizzes and towards short writing assignments. We also have changed some projects to incorporate more ideas of visual communication as a form of writing. As far as CCSS, I am continuing to follow the idea that art is a text meaning students can read artwork as a text and write artwork as a text to meet these standards. 

One of the lessons we’ve changed is the still life lesson. Before: students are instructed to choose 3 objects, set them up in a still life scene, and draw them using 7 different values. After CCSS changes: students are instructed to look at examples of still life paintings/drawings that tell a story. They will choose 3 objects that tell a story (drawing instructions are the same as before) and they must title their still life drawing something that describes their story. A rather small change not only aligns with CCSS but also incorporates more meaning and excitement into this project.
In addition to artwork as a text, it is helpful to know what your school offers in the way of textbooks or online resources to provide students with readings at grade level that go along with your content. 
In the texture lesson, students currently learn the differences between simulated (2D) and tactile (3D) textures and create a texture study by drawing out 4 different textures. We thought this would be a good opportunity to have students look closer at sculpture through an article in Scholastic Arts Magazine. For teachers who don’t know about this resource, it is an amazing way to align to CCSS. It provides articles, images, videos, and even written and multiple-choice assessments for grades 4-12! Right now, all the digital resources including issues of the magazine are free, though at some point will become viewable only to subscribers. We are going to use the section on sculptures from a recent issue to have students write about the role that texture plays in whichever sculpture they choose.  
 Looking at our lessons to align them with CCSS has allowed my team to focus on changing lessons that have been weak in the past. A lesson many students have trouble with is our Cubism lesson. Students learn about the style of cubism and about Picasso and Braque. With this knowledge, they create 2 pieces of art, one that is realistic, and one that is a cubist version of that same subject matter. We discuss the differences and similarities between analytic and synthetic cubism but students still have trouble with this concept, especially when it comes to making their cubist artworks. Thus I have added a reading and sorting activity to this unit to help students spend time looking at synthetic and analytic cubism more closely. Students will get their reading from Encyclopedia Britannica and use the reading to guide them in arranging characteristics of analytic and synthetic cubism into the correct categories.  

Whatever lessons you teach in your art classroom, aligning to CCSS does not have to mean big changes and extra work. Small changes and additions can make your lessons more meaningful and help students succeed.

Monday, February 11, 2013

Making Students Proud

When I speak to many of my students for the first time, they are nervous about taking an art class. They feel they're bad at drawing and that I am going to judge their work on standards set by other students who are "much better" than they are. One of my missions as an art teacher is to help my students become more confident in their work. When they feel confident, they work harder on their drawings which sometimes even translates to work in their other classes. As a student who struggled in the beginning of high school, I didn't really believe I could achieve good grades until one of my teachers showed me I could by helping me earn my first A. After that, I worked very hard to keep an average of A's and B's for the rest of high school and got into my first choice of colleges.
I see many of my students feeling as though they can't succeed and I am striving to find ways to help them feel confident in what they do so they can use this confidence in all aspects of their learning. A couple ways I have done this in my classroom are giving detailed feedback and posting their work for others to see.
When I give students feedback, I make sure it is detailed and includes both positive comments and ways for them to improve (growth-producing feedback!). Because I don't always have the opportunity to talk to every student about each project, my written feedback is where they get this information. 
Some examples of feedback: 
"-------, this is a great start. It looks like you used linear perspective correctly here to create a complex 3-dimensional house. However, your drawing is very sketch-like and looks unfinished. Please spend some more time on this drawing to complete it for an A. (Think about what you can add to the setting, darken up lines, straighten up lines)."
"------, your use of detail is fantastic in this drawing and your house looks 3-dimensional. However, it does not look like you used a vanishing point as your guide. Remember, the vanishing point is always on the horizon line. Please review my corrections and submit a quick sketch showing me you understand how to use a vanishing point in your drawing for an A." For this feedback I also gave the student visual feedback as well to help him improve (see below)


As an online teacher I don't have a bulletin board to display student work so instead I use digital tools. In the past I have used simple HTML pages to display images of student work but I have found a new, exciting tool this year. I use a website called Animoto to create videos of student artwork. As a teacher you can get a free education account if you are a teacher which gives you more video themes to pick from and does not limit the number of videos you can create. This tool makes viewing their artwork and classmates' work fun and engaging and I have had wonderful feedback so far from students and administrators.