Showing posts with label curriculum. Show all posts

Tuesday, August 9, 2016

Course Creation and Project Based Learning

This summer has felt like a blur! I'm sure I'm not the only teacher who is feeling that this year. I was up to something really exciting this summer though. I spent the summer writing a brand new course: Graphic Design! I've written and edited courses before on painting and drawing several times, both for summer school and semester schedules. This project however was much larger due to it being newer subject matter for me and I was writing it from scratch. I was also given free reign on what technology pieces I would like to teach in the course, including the entire Adobe Creative Suite, so I was feeling both incredibly lucky and overwhelmed with choice.

I started with a mind map of what exactly I could cover in a course that would be the only level of graphic design we are currently offering at my school. I found a wealth of resources online and also consulted the library (where I checked out so many books I could barely carry them out). Once I had a plan, looked at the Ohio Visual Arts Standards and started thinking about assessments.

For this course, authentic assessment and project based learning were goals of mine because of the career-based subject matter of the course. So, I created a graphic design “company” and framed the course around my students being a team of designers working for our clients and myself as the team leader.

The beginning of any online or traditional course can benefit from a “Getting to Know You” activity of some sort. This course is a bit special because I started students with a job application for the design company.

Each assignment in the course describes a story of the client who has approached the company and what they need from the team of designers. I'm excited to see how students respond to this ongoing theme of on the job training and real world situations. More to come! 

Wednesday, May 13, 2015

Buried Treasure: Communicating Learning Outcomes

We all have goals for our students. Whether they be state standards and benchmarks we are aiming for our students to hit, or more student-friendly learning outcomes written in language that students understand. I have seen this illustrated in different ways in classrooms I have visited. Sometimes they are posted on the wall by grade level, other times they are printed on syllabi or posted on the introduction page for a lesson.
It is important for students to understand what they are going to gain from our classes and I think sometimes this gets lost somewhere between when we share these desired learning outcomes and when they go in one ear and out the other for students, or aren't read or heard in the first place.
For years, I have wanted to develop a fun an visual way for students to see what they are learning in my Art 1 class and how they are learning it. In my school we use the term "course map" to describe the document that houses all of our learning outcomes and assessments for a course. I decided to create a REAL course map modeled after a treasure map, because as we all know, learning is like discovering new exciting gems!

Click to enlarge
I made this map in Photoshop and really enjoyed it because I am a big nerd. I hope that my new map catches the eyes of my students and helps them understand the journey they are taking in my class. What ways can you think of to help students understand the "what" and "why" of their learning in your class?

Tuesday, April 21, 2015

Active Learning in the (Online) Art Classroom

As part of my the Online Teaching and Learning Certificate I am currently pursuing, I recently took a course all about creating interactive learning objects for my classroom. A learning object is an interactive activity which presents lesson material to students in a way that offers opportunities for practice and sometimes employ digital storytelling. Learning objects are great because they allow students to explore a topic at their own pace, offer practice and feedback, and sometimes even provide branching (think choose your own adventure) that takes a student through a branch based on their responses. The possibilities are endless and learning objects can be implemented in all types of learning environments including brick and mortar or blended art rooms. They can be a great opportunity for independent learning, without being as static as book work.

Creating a learning object can be hard work! I spent weeks creating one all about Feldman's Model of Art Criticism that puts students in the role of the art critic. I used Articulate Storyline to create my learning object which provides many interactive features and is fairly intuitive to use. This tool does have a cost associated with it, but there are many free tools available (click here for a list) and it is even possible to create learning objects through Microsoft Powerpoint by adding links to buttons.

But, there is an easier way to start using learning objects (LO's) in your art classroom without creating them. There are many art education learning objects already created online.

Here are some of my favorite Art Ed learning objects:

This activity is the one I created which puts the student in the role of the art critic and presents Feldman's Model of Art Criticism. 

This LO allows the student to explore the elements of art and practice using them in a free form composition tool. 

This LO allows students to test the affects of a manual DSLR camera.

This LO explores the color wheel, tints, tones, shades, and color schemes. It also allows for students to practice blending colors and building their own color wheel. 

These links barely scratch the surface of what is out there so explore on your own as well. I have really enjoyed learning about new ways to insert some interactivity into my asynchronous environment and I hope you enjoy them too!


Friday, January 30, 2015

Course Building

As I continue to learn about the various best practices for creating curriculum for online learning, I have chosen my Art 5 course as the curriculum that I am going to beef up in my University of Cincinnati course on curriculum design for online learning.
I have revised this course several times since I began teaching it 3 years ago. At first, I set up the course in an independent study style where I expected that students would be able to design, plan, and create their own art projects. I assumed all of my students had enough experience in 4 levels of art before my course that they would feel comfortable being autonomous with a coach or guide giving feedback. What I found is that students wanted more direction.
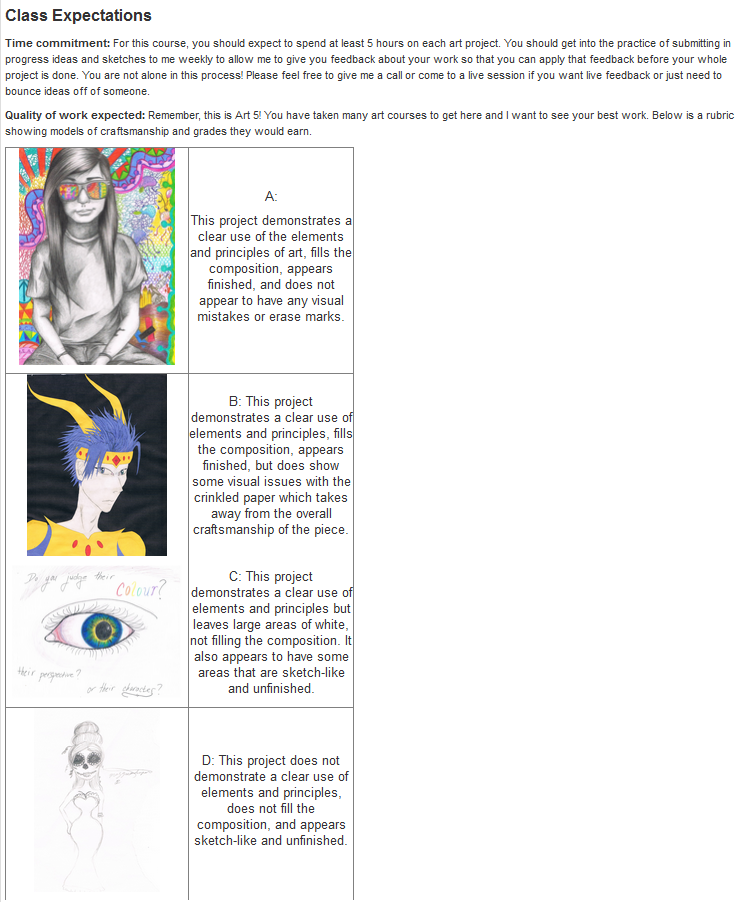
The second version of Art 5 included more conceptual direction for students with parameters for them to follow but freedom to choose materials and make compositional choices. For several years this has worked but I have noticed that students are not putting forth their best work technically or spending the time required on these projects. This is a challenge when working with students online because they do not have idle studio time to fill like they would in a brick and mortar classroom. They choose how long they work on a project and many times they do not plan for long enough when left to their own devices. This, along with the motivation from class has caused me to create a course overview page that explains to students what I expect of them.
I am also working on altering a few of my weaker lessons to include some technical demonstrations and challenges for my students. Other advanced/AP art teachers, how do you push your students to give you their best work? What kinds of projects would you offer for a portfolio development class? Any ideas are appreciated!

Wednesday, January 14, 2015

Thinking About Instructional Design

I am excited because this week I began a class at the University of Cincinnati all about curriculum design for online learning. Though I have created my own curriculum before, I have not had much formal instruction on how to plan with the online learner in mind. I have been learning and working through trial and error. For my first assignment in class, I was prompted to design my own instructional planning model based on research and existing models. Here is what I came up with.

What does your model look like? Think about the steps you go through when planning instruction for your students. What do you find most effective?

Monday, May 5, 2014

The Open Art Room - Creating Structure as a Team

During my first semester this year, I had a student ask to meet with me one-on-one in our synchronous classroom software, WebEx. Often when I am trying to help students get caught up with their work, we meet and discuss which assignments to focus on and I can show them examples of the projects and answer any questions. I also showed this student demonstrations using my document camera. He really found our meeting helpful and we continued to meet like this once a week until the semester ended. He told me that working with a teacher like this made him feel more like he was in a classroom, like he was not working alone.
This got me thinking, how can I regularly create this environment for students? After speaking with some of my colleagues, "Open Art" was born. Open Art is offered to students once a week. The session is run by myself and 3 other teachers and it is open to students in any of our sections. During the session, we walk students through each step of the weekly project, demonstrate over the webcam, and answer questions as students work individually. We allow students to work at their own pace by letting them roam freely through the slides after we have reviewed them. At the end of the session students will have their project done or developed enough to finish on their own.
Here is a sample presentation from one of our sessions:


We have seen consistent attendance at these sessions and find that students appreciate the extra structure that Open Art offers them. Students know that they can plan to do their art homework during the session and can have someone there to guide them through it. Also during these sessions, our special education teacher is able to open breakout rooms to work with students one-on-one. It has been wonderful to collaborate with other teachers on my team to make sure these sessions run smoothly. I will definitely be implementing Open Art again next year!

Thursday, January 2, 2014

Getting Silly and the Passing Packet

As we approach the end of semester 1 for 2013-2014, there has been a big focus in my department around pass rates. This school year is the first time in Ohio that a fine arts credit is required for all students to graduate. As an art teacher, I think this is fantastic news! However, it has been a challenge this year with an increased population of students being placed in my Art 1 class who do not want to be there and also might not know about the new requirement. Engagement is always a challenge in an online environment, especially when students are not interested in the content. I also often find that students have high anxiety about drawing and art in general. There are many ways I work to soften and break down these barriers of learning in my class through video, step-by-step instructions, live lessons, demonstrations, and working with students one-on-one. However, for the students who aren't looking at my lesson pages at all, it is a bit more difficult to help them. Thus, I have begun to get a little more creative with my approach to reach reluctant learners, and even a little silly. 
I have created a document called the "Passing Packet" which is a word document that includes all of the lesson materials and project instructions for all of the projects students are required to do to pass. I have broken it down to make it as simple as possible. Complete the packet, earn your credit. Now, I do not distribute this information to students who are already engaging and being successful. I only give it to students who have not engaged in the content throughout the first 15 weeks of school. It is my hope that I can engage even the most reluctant learners to engage and pass Art 1. I also worked with my co-teacher Dana to create a fun video that helps remind students we have a sense of humor, and even though they might be frustrated, we are here do everything we can to help.

Wednesday, February 20, 2013

Aligning to Common Core in the (Online) Art Classroom

As the 2012-2013 school year continues to tick by, we continue to align the Art 1 classroom to meet the Common Core State Standards (CCSS), which will be mandatory by 2014-2015. Though it seems far away, my teammates and I are already working towards 100% alignment. Of course we all still have many questions. We spent last week together in PD brainstorming ideas for aligning our Art 1 curriculum to the CCSS. In many cases we are adding small written assignments to accompany drawing projects. This has lead to some shifts away from reading quizzes and towards short writing assignments. We also have changed some projects to incorporate more ideas of visual communication as a form of writing. As far as CCSS, I am continuing to follow the idea that art is a text meaning students can read artwork as a text and write artwork as a text to meet these standards. 

One of the lessons we’ve changed is the still life lesson. Before: students are instructed to choose 3 objects, set them up in a still life scene, and draw them using 7 different values. After CCSS changes: students are instructed to look at examples of still life paintings/drawings that tell a story. They will choose 3 objects that tell a story (drawing instructions are the same as before) and they must title their still life drawing something that describes their story. A rather small change not only aligns with CCSS but also incorporates more meaning and excitement into this project.
In addition to artwork as a text, it is helpful to know what your school offers in the way of textbooks or online resources to provide students with readings at grade level that go along with your content. 
In the texture lesson, students currently learn the differences between simulated (2D) and tactile (3D) textures and create a texture study by drawing out 4 different textures. We thought this would be a good opportunity to have students look closer at sculpture through an article in Scholastic Arts Magazine. For teachers who don’t know about this resource, it is an amazing way to align to CCSS. It provides articles, images, videos, and even written and multiple-choice assessments for grades 4-12! Right now, all the digital resources including issues of the magazine are free, though at some point will become viewable only to subscribers. We are going to use the section on sculptures from a recent issue to have students write about the role that texture plays in whichever sculpture they choose.  
 Looking at our lessons to align them with CCSS has allowed my team to focus on changing lessons that have been weak in the past. A lesson many students have trouble with is our Cubism lesson. Students learn about the style of cubism and about Picasso and Braque. With this knowledge, they create 2 pieces of art, one that is realistic, and one that is a cubist version of that same subject matter. We discuss the differences and similarities between analytic and synthetic cubism but students still have trouble with this concept, especially when it comes to making their cubist artworks. Thus I have added a reading and sorting activity to this unit to help students spend time looking at synthetic and analytic cubism more closely. Students will get their reading from Encyclopedia Britannica and use the reading to guide them in arranging characteristics of analytic and synthetic cubism into the correct categories.  

Whatever lessons you teach in your art classroom, aligning to CCSS does not have to mean big changes and extra work. Small changes and additions can make your lessons more meaningful and help students succeed.

Tuesday, December 4, 2012

Thoughts on Common Core and the Arts


I just spent the last 2 full days learning about the Common Core State Standards (CCSS) and the PARCC test that will go along with them. While at first overwhelmed and confused about how to apply these new literacy standards to the existing art curriculum, I have spent time researching what others are doing and working with my teammates to come up with some ideas. I am now very excited about these new standards. It has been said that the shift from the OGT test and current standards to the PARCC test and CCSS will switch our focus as teachers from teaching students what to think to teaching students how to think. And while the OGT’s never tested the arts, the CCSS for literacy is being introduced as everyone’s responsibility. They even have specific standards for us to meet, grouping all electives into a category called “other technical subjects”. Though this gives us art teachers more to cover in our classes and more curriculum to write, I am happily embracing this challenge to help our students become better thinkers. It seems to me that the CCSS are here to encourage us all to be better educators and really prepare our students for college and careers. Looking at the standards there were many things I was unclear about. One point of emphasis in the literacy standards was having students read complex texts. At first I wondered where we would find these complex texts for our students to read (online we do not have a text book to refer to) and also how these complex texts might relate to visual learning. I started googling “common core and the arts” and found a very helpful blog post (here) that outlines how a piece of art can be a “text” that students read. This really helped me get past my confusion and helped me come up with my first CCSS aligned lesson for my Art 1 classroom. Students complete a project in Art 1 where they create two portraits where at least one contains symbolism. In our live session we look at Renaissance portraiture and how artists communicate to the viewer about their subject such as personality or social standing. Though we always discuss this topic, I never have them write about it. Therefore, this lesson was one that could use a writing portion, and why not align it to the CCSS? Below is the assignment I came up with that I will be trying out next semester. It encourages students to “read” the pieces of art, analyze them, and provide evidence for their conclusions (evidence is very important in the literacy CCSS).

Portrait Analysis
You will begin your study of portraits in this lesson by looking at and analyzing the way that artists create portraits. Portraits often contain symbolism within them. Symbolism is the use of something that stands for or suggests something else by reason of relationship, association, convention, or accidental resemblance. When artists use symbolism in portraits they are communicating about their subject to the viewer. For example, the type of clothing a subject is wearing in a portrait can tell us about their social class or the culture they come from. The objects surrounding the subject can tell about them too, if they are surrounded by books perhaps they are a student or scholar. For this assignment you will act as a detective to find clues within 2 portraits that inform you about the subject of the work!

Artemisia Gentileschi, 1615
Self Portrait as a Female Martyr
Paul Gauguin, 1886, Self-Portrait
Frida Kahlo, 1940
Self-portrait with Thorn Necklace and Hummingbird
Kehinde Wiley, 2007, Dwayne I

Your Assignment
  • You will need to choose 2 portraits to write about from above. Write a detailed paragraph about each portrait answering the following questions:
    1. What kind of social class is the subject from? (wealthy, poor, middle class, royal...etc.) How does the artist communicate this?
    2. What do you think the subject's personality is like? How does the artist communicate this?
    3. Are their symbols present in the portrait? What do you think they mean? Why?
    4. Why do you think this portrait was created? Is there a story behind it? Why or why not?
  • Make sure you are giving specific examples of evidence from each portrait for your answers.
  • Think about how these artists captured their subjects in these portraits when creating your own portrait drawings! How can you show this person's personality and likeness? How can you incorporate symbolism?
  • Submit your finished essay to the dropbox.  

I am just beginning this task of aligning curriculum with the CCSS but I expect I’ll be posting more lesson ideas soon!

Thursday, November 1, 2012

Developing an Online/Blended Studio Art Course

I have recently been asked by a former cooperating teacher to share my incites about creating an online art class. His department is being asked to do this for their brick and mortar school. So many schools are starting to create blended learning programs within their schools and I decided to share my ideas I'll be presenting to these teachers here as well.

Important Points to Remember

  • Set a timeline and due dates-This allows a flexible class to still have structure and keep students on track with their work. See image to the left.
  • Provide multiple forms of instruction (written instructions, visuals, student examples, videos)-You should provide everything you would in a traditional classroom but in a digital format. If you were to do a demonstration, make a video. Images of artwork and student examples can really get students interested and communicate the content better.
  • Provide multiple forms of assessment (quizzes check reading, project demonstrates mastery, reflection questions show understanding)-I use projects as the biggest form of assessment in my classroom but I find quizzes and written work show another view of what students understand and are taking home from each lesson.
  • Simple materials unless provided-Unlike the traditional classroom where you order supplies, in many cases students need to provide their own. Keep it simple when choosing supplies keeping in mind safety and cost.
  • Be available for questions-Students need to know they can reach you if they need help by email, telephone, or in person.
  • Give feedback for every grade-Written feedback is essential for communicating to students who are working independently about how they can improve or what they are successful at. In my classroom students are also able to make corrections and resubmit work for a better grade. This is something I have found to work well but it is up to you.

Sample Lessons

For a complete look at all the elements I include in the lesson visit my What Does a Lesson Look Like? post.
Here I have provided some images of what the curriculum pages look like in my classroom.


Art 1 Sample Lesson


This Art 1 lesson includes many visuals, some vocabulary, and many written instructions for students because this is an introductory course. I also included a video in this lesson to show what it looks like when someone is doing the shading techniques. I encourage students to include objects in their still life that tell a story. For most Art 1 projects they have a week to complete them.


Art 5 Sample Lesson


By contrast, this Art 5 lesson includes lesson visuals, more writing, and a project about concept rather than technique. The students in Art 5 should have much more experience in working independently on projects and are working on creating a portfolio for colleges. For Art 5, students have multiple weeks to complete projects but I ask for in progress work checks to provide feedback and direction when needed.

Thursday, May 3, 2012

Spring Things


It’s been a little bit longer than I wanted since I updated but it has been a busy time for my school and myself lately. A couple weeks ago we took a field trip to the Columbus Museum of Art and had a nice turn out of students and parents. We had a docent-led tour that was very fun and informative. As always it is so nice to meet my students. I also had an opportunity to meet with them at our recent Family Night, an event held in many cities in the state for parents and students to attend and meet their teachers while doing fun activities like trying out for the talent show! It is neat to see how an online school holds a talent show. Students audition in front of a camera at Family Nights and their classmates vote on the best videos online to decide the winner. This is similar to how the Senior T-shirt Design contest is judged as well. Our art department picked 4 finalists and students will soon vote for a winner whose design will be printed on the Class 2012 t-shirt. At Family Night I had the pleasure of gluing down our Art Club collage for the year. Students each sent in several doodle squares and I combined them into a collaborative collage. I also worked with students at Family Night to create doodles that will be used to make another collaborative collage that will be constructed by students, friends, and family members at events in the future. I love finding new ways to get students excited about Art! 

Tuesday, April 3, 2012

What Does a Lesson Look Like?


Screen shots of lesson pages
This week I am teaching a lesson about color theory and I realized I have not actually shown how the classroom looks for students as they complete a lesson. Translating content from the traditional classroom to online means presenting all of the content you would have lectured about, demonstrated, or delivered in other activities in a way that can be understood using only web pages in the classroom. It is important that the content be engaging and clear to help students understand without a teacher standing in front of them delivering the content. All online education platforms look different but I will share elements I believe to be important for framing an art lesson in my classroom.
Important Elements of an Online Art Lesson:
1.    Introduction-I use the introduction page to explain to student what they will be learning for the lesson or unit. The page also offers a printable version of all classroom content for students who prefer to work away from their computers.
2.     Content: This is what I would describe as the online “text book”. This is where students read about new content that I also deliver in my live lessons. I include images to engage students and promote understanding of art concepts.
3.    Assignment: Most weeks students complete one art project for my class. The assignment page lays out the instructions for the project and some requirements I am looking for.
4.    Examples: Just like many brick and mortar art teachers show teacher examples and student exemplars in person, I share them online. Students can use this page to get a better idea of what the assignment could look like.
5.     Demonstration Video: For some lessons myself and other art teachers in my team create demo videos to show student techniques for their projects. This is just like doing a demo in the brick and mortar classroom, but students can pause and watch as many times as they need!
6.    Practice: For some lessons I offer students a way to practice their new knowledge in a risk-free non-graded worksheet or web page. This week students can use this work sheet to remember different color schemes for their quiz.
7.    Quiz: I implemented a quiz for this assignment to measure student understanding of the different color theory terms. This also encourages students to read the content because they know they are being held accountable for knowing it.
8.    Rubric: Like many art teachers, I recognize that grading art is difficult! I include rubrics for each lesson that remind students and myself of what I am looking for in their work.

This is the first time I have used this project in Art 1 so I am excited to see what the results will be. I will share student examples when they are completed.

Thursday, March 22, 2012

Writing New Curriculum for Art 5


Snapshot of the current Art 5 classroom
 Throughout the year I have learned many techniques that work well for teaching art online in my Art 1 class. I have been offered the opportunity to teach Art 5 next year and I want to put my learning to use when creating this class. There is an old Art 5 curriculum in place but it has not been used for a number of years and I would like to put some of my ideas to use. Art 1 is a very large class with around 200 students, which makes some ideas I’ve had more difficult to put into action. The purpose of the Art 5 class will be for students to prepare portfolios for art schools so that will be my end goal for students. Knowing this, I will focus on portfolio development and artist statements as an advanced art class in a brick and mortar school would as well. I have been brainstorming ideas specific to teaching an advanced art class online that will help my students get a rich experience and come out with beautiful portfolios.
An issue I have always run into in Art 1 is the limited supplies. Because Art 1 is an introductory class and many students need to take it, the supply list is rather basic. For Art 5 I plan to let students decide the media they want to work with in their assignments. I will include a manual of basic instructions for many art materials so students can get ideas and decide what they can afford and would like to work with. This will allow students to experiment with new media or work with something they are comfortable with so their portfolio really shows who they are as an artist.
My assignments in Art 1 are very structured, however I want to try more broad assignments with my Art 5 students. Students will have at least two pieces they need to plan, design, and create. They will fill out a planning sheet that describes their concept, what supplies they need, and a time line for their creation. Teaching online as I have said before, does not allow me to see the whole process of a student’s art making. In Art 5 I want to work towards more in progress critiques as a class in WebEx, but also between teach and student. I will require students to turn in sketches and partially completed pieces for feedback so they may improve the work before it is done. Though I might allow up to four weeks for a student to finish a piece I will require them to show me something each week.  
I have created a rich community of students in my Art 1 class through live sessions and a discussion board in the classroom. Students post artwork they like and that they have created in and outside of class for their classmates to see. Since the beginning of the semester the “Share Your Art” discussion board has been viewed more than 600 times! I plan to continue this idea in Art 5 as a place for students to share ideas with their classmates when a live session is not going on. I hope to create a community between these students in the small group class that it will be. I also believe that using the discussion board as well as WebEx sessions to share their work will motivate students and hold them accountable for completing work on time.
I am excited to put everything I’ve learned into a new course and I cannot wait to see how it turns out.